Posts tonen met het label Scrapbooks tutorials. Alle posts tonen

zaterdag 14 mei 2011

Doodle edges shapes

CU OK Doodle Edge Shapes .csh and pngs

Today’s freebie is a set of doodle edges that you can use as they are or you can use them to create template shapes for your layouts.  I captured a few screen shots to show you what I mean. All of the shapes are at least 3600 pix wide so you just plop one on your layout:
Tut1
Then using your magic wand select the area under or over the doodle, with your contiguous box checked.  Create a layer under the doodle layer and expand your selection by a few pixels.
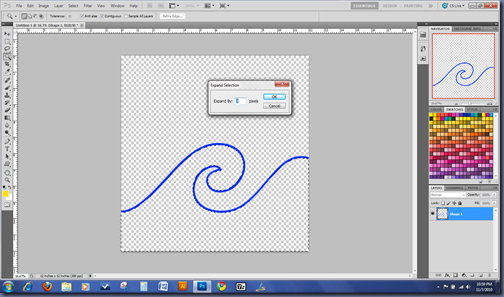
Tut2Then fill the selection on your blank layer with a color:
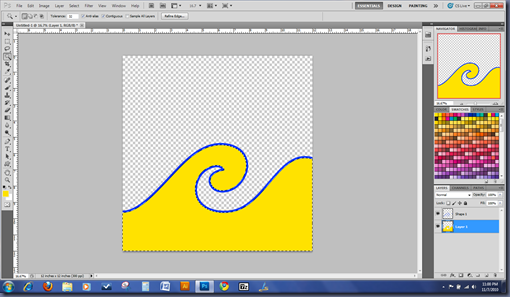
Tut3While you still have your marching ants, invert your selection and create another layer above the layer you just filled in and fill it with a different color:
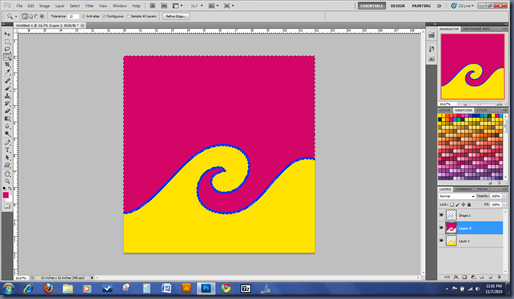
Tut4Deselect and you can remove or hide the doodle area if you want, or keep it depending on your taste:
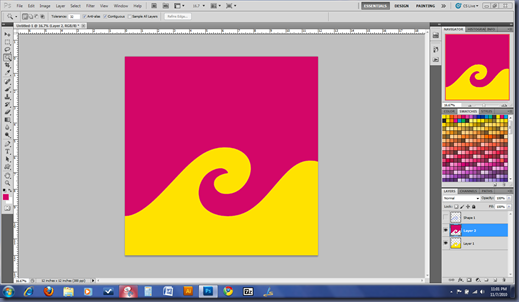
Tut5You can clip a background paper to each of the shape layers or just apply a layer style, it’s really up to you!
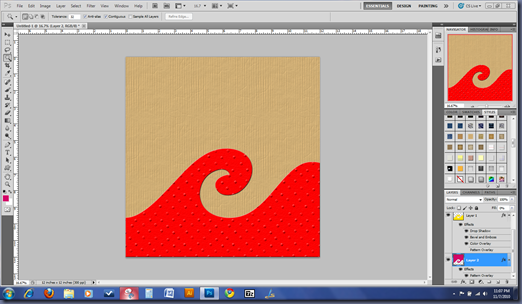
Tut6      

dinsdag 10 mei 2011

Scattered Glitter Tutorial


OK for installing and using glitter look HERE
Now you want it to look like sprinkled glitter?
STEP 1:
Download this brush HERE. May only work in photoshop CS3.
or
Choose a round or square brush, 25px-50px is good.
size
Set it to Scatter.
scatter
And also play with the size jitter & angle jitter, spacing etc…
size
STEP 2:
Then brush, and add glitter style to finish! Also adding a very small shadow makes it look more 3D.
brushed
shadow
glitter
ALL DONE!
finished

Drop Shadows


The shadow settings I most commonly use for scrapping & designing.
These shadows are the ones I use when making clusters for kits & frames and also my previews.
Download free Photoshop shadow styles here.
For photoshop & photoshop elements only.
Designers you can use them for your previews and designs.
Installation & style instructions are HERE
Settings in order small to large.
You can change the angle to suit yourself.
And change the colour to a darker version of whatever paper/element the shadow is sitting on.
*TIP* Use the colour picker to help you.
Adust the opacity of the linear burn for different papers etc…

Drop Shadows part 2

This tutorial is for Photoshop CS2 & CS3. You need the warp tool.
For creating more realistic shadows where you can make the photo or paper look like it is curling off the page.
STEP 1:
Drag your photo or paper, onto your canvas. I have just used a small paper piece as a example.
STEP 2:
Duplicate it by pressing CTRL+J or go to LAYER —>Duplicate Layer.
Make sure you have the bottom copy selected.
STEP 3:
Then we want to darken it so hit CTRL+U or go to IMAGE—>Adjustments—>Hue/Saturation. I make mine black for this tutorial.
STEP 4:
Now we want to blur it a little. Go to FILTER—>Blur—>Gaussian Blur and choose the right blur for your page.
You’ll come know what is right by playing around. On this small 600×600 canvas I have used 3. But on most full size pages I tend to use 8, 10 or 12.
Now it should look like this:
STEP 5:
Using your arrows keys on the keyboard we want to nudge it a little. To match the angle I tend to use I have gone up and left. Hit up once then left twice.
Then we will warp the shadow. Go to EDIT—>Transform—>Warp.
For this I have dragged the corners out a little. Just play around and try and do it visually.
Then lower the shadow opacity.
I used 60%
ALL DONE!
————————————————————————————
ALTERNATIVE:
This is for REALLY curling the photo off the page.
Follow the steps 1- 4. Then instead of warping the shdow we will warp the actual photo/frame/paper.
Make sure you have the top layer selected.
Go to EDIT—>Transform—>Warp and drag the corner up and into the n=middle slightly.
Then I also warp the shadow layer a little.
Lower the opacity again. And even use a little dodge & Burn on the lift.
ALL DONE!

Installation & Using Styles Tutorial

CLICK HERE for installation in PSE 4-8 & Other programs

STEP 1:
First up go to WINDOW-STYLES so your styles palette is visible.
STEP2:
Go to load styles by clicking the small lines on the top right hand corner of the styles palette.
STEP3:
Open up anything you want to add glitter to.
STEP 4:
Make sure the element is selected, then click on the icon in the STYLES palette.
Tut
STEP 5:
To adjust the size of the glitter pattern simply double click the thumbnail, then adjust the pattern overlay %. I use 100% for designing. Always stick to 25%, 50% or 100% anything else will be blurry.
On a canvas any less dpi than 300 your glitter may look blurry. So adjust accordingly.
This star is 72 dpi. The style defaulted to 24% and was blurry at 100%.
Capture4
At 50% pattern it was perfect.
Capture5
Just use your eye and adjust till it looks good for YOU.
STEP 6:
Then open up the sparkles in the read me file and add to your project!
tut2
All done!
tut3

How To Open And Use Actons


Here is a quick tutorial on how to open and use actions in Photoshop.

First you have to download an action - you may get some for freeHERE

Click Read More to continue

Ok, Now let's just make sure the actions panel is open. Click on Window->Actions


Now we are going to select the action panel to make sure it is visible


Now we are going to open the desired action. Alternatively you may choose to drag the required actions into your open Photoshop workspace. We are going to use a different method and just go to File->Open and open the action.


Now you should see it at the bottom of your Actions palette highlighted


Now click on the little triangle next to the name to open the set. There is usually one action but sometimes there could be more in a set.


Now select the action and press play at the bottom of the actions panel.


And you are done!!

Using Styles in Photoshop


I was asked to create this tutorial a few times. There are a few ways to get the styles into your workspace - you may also drag the styles into Photoshop. Here is another way. I am using my free "Pink Love" styles available HERE

Firs off open Photoshop.

Then we are going to open the styles - click on File-> Open


Then we are going to make sure our "Styles Palette" is visible we need to go to Window-> Styles


After making sure it is visible we are just going to select it by clicking on it on the right side of your open Photoshop program


Then you will see your newly installed styles there - if you do not see them just repeat File -> Open step and open your styles - make sure you select the file ending with .asl


Now just create a new file and draw a shape or text to which you would like the styles to be applied to - I have typed PINK LOVE as an example. (These particular styles are for large images so make sure you are working with a large image for best effect)


Now make sure the layer you want the style applied to is selected just click on the desired style and voilà - you're done! You may click on style after style after style to change the look!


Hope you had fun creating!

Creating Actions - The Basics


Actions are ones of the best things in Photoshop :) I have created some major time savers and use them every time I am designing or creating layouts.

I will show you today how to begin recording actions - the basic steps. This tutorial was made by me in CS3 - the basics will work for CS4 as well.

First we want to make our Actions palette visible. Click on Window->Actions.


Now we are going to create a new set like this.


Name your set and press OK.


Now we are going to create the actual Action. Click on the little Icon to create a new action and name it.


Use the controls at the bottom to stop if needed - to start recording again press record.


***Now record your action!!!*** I do not know that much about action recording - I have learned everything by trial and error and I have been making my own actions for months to save time while using Photoshop that is how I learned to record them.

After you have recorded your action will need to save it. Press on the top right arrow icon in the Actions palette.


Then click Save Actions and Save :)


And you're done!