This is my most favorite secret of all! We just updated the coding as of January 2011. It is now super EASY to apply the blog background you made! You can use almost any photo editing program to make your own backgrounds. I use Photoshop, but since that program can be a little pricey, there's also programs like Microsoft Publisher, Microsoft PowerPoint, or a very cool program you can download for free online from a site called Paint.net (this program has many of the Photoshop features, but without the price!) I also just found out about another one called GIMP you could try.
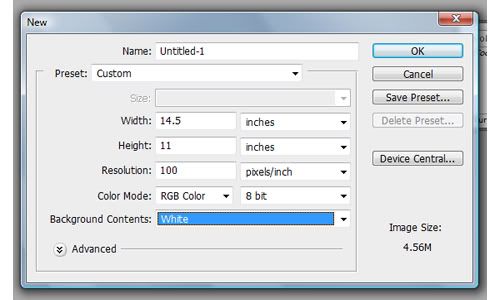
Start with a new screen and make sure the sizes are as follows:
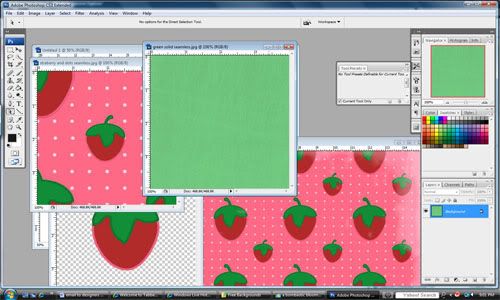
Next, open up all of the elements that you plan to use with your background. There are lots of free digital scrapbook download website for you to find cute stuff on. One of my favorite sites is http://www.digiscrapdepot.com/ . Remember, there are very strict piracy laws when using someone elses designs. You may only use these elements on your own blog. You may not redistribute these products in ANY way.
These are the elements I will be using for my project today:
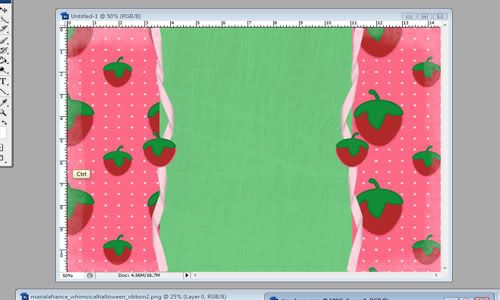
Next you need to put all of the basic elements onto your background. Be sure to keep the follow measurements in mind. You need to stretch and pull to make everything look just right.
This is my basic background

Please note: If you are creating a 3 column background, you will want to make the center at least 9 inches (or more) wide.
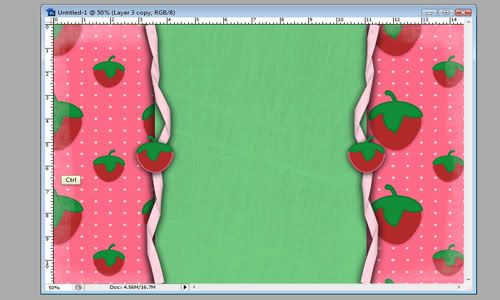
Next you‚ add any fun elements to your project. Make sure everything is placed so that you will be able to see it on your monitor once the background is applied. Ribbon is always a fun addition to any background.
Below is my background with the elements added:
Next you get to have fun! Play around with the colors, shadowing, sizes of everything. Decide which elements you want to POP and add a glow or shadow around them. Just be creative!
This is my completed background:
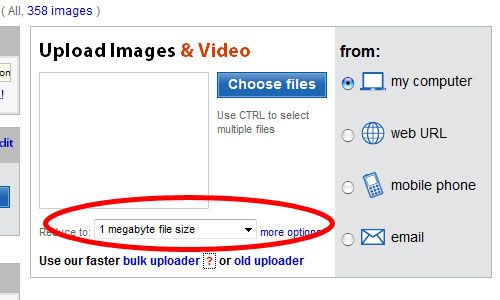
You must have an account with www.photobucket.com or Flickr to do this next part. Log in to your account and go to your image gallery. You'll see the following box, where you will upload your background, but first and this is so important, you MUST change the reduce to‚ area to say 1 megabyte! This will make sure that your background will stretch the entire length of your screen.
UPDATE: if you save your background as a 1 megabyte, and you find that it is STILL TOO SMALL, try uploading it as a 2 megabyte. It will fit much better.
UPDATE #2: compliments of Heidi Fowler, who suggested this, you can also save the file at a lower resolution or file size, this will make it so that the image is not as high resolution and you can use it! Thanks Heidi!
UPDATE #3: If your background is still showing up too small, you'll need to upgrade your photobucket account (This is not free) to a premier account. That way you can upload any file, any size, any time you want and it will always fit on your blog. :)
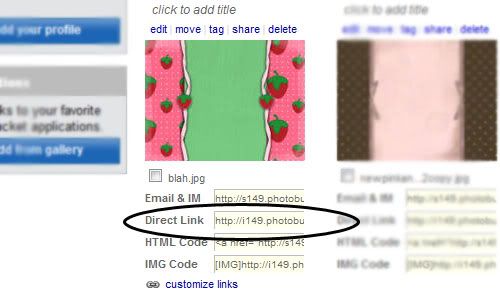
Once your background uploads, you'll need to find the direct link and use this in the next steps:
NOW you'll need to follow these specific instructions as to how to apply it to your blog:
1. Log onto your blog.
2. Click on your 'Design' tab.
3. Click 'Edit HTML'.
4. Hit Ctl F and paste this in your find box; body {background
It will pull up the part of the code that looks like this:

5. Highlight that code and delete it. Replace it with this code:
body {
background: url(INSERT YOUR PHOTOBUCKET LINK HERE) no-repeat center fixed #FFFFFF;
It will now look like this:

6. Get your photobucket link and insert it between the parenthesis to replace the text INSERT PHOTOBUCKET LINK.
7. Click preview to make sure it looks good and then save template! Congratulations on making your OWN background for you blog! I bet it looks fabulous!
Geen opmerkingen:
Een reactie posten